
Here is a look at installing Luts on the various NLE platforms and most, if not all others have similar techniques to install Luts and there will be a video tutorial with a link below on installing the Luts into FCPX but it is an easy search on Youtube as there will be so many videos that all show you how to install your luts into other platforms 🙂
![]()
-
In Final Cut Pro, select one or more video clips recorded with the log option.
-
If the inspector isn’t already shown, do one of the following:
-
Choose Window > Show in Workspace > Inspector (or press Command-4).
-
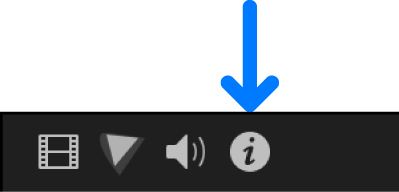
Click the Inspector button on the right side of the toolbar.

-
-
Click the Info button at the top of the inspector.
-
Click the Metadata View pop-up menu in the bottom-left corner of the Info inspector and choose General, Extended, or Settings.

-
In the Info inspector, click the Metadata View pop-up menu in the bottom-left corner and choose General, Extended, or Settings.
The Metadata View pop-up menu
Click the Camera LUT pop-up menu and choose Add Custom Camera LUT.
In the window that appears, navigate to the LUT file you want to import, and select it.
You can import 3D LUT files with the filename extensions .cube and .mga. You can select single files, multiple files, or a folder of files.
Click the Output Color Space pop-up menu and choose the target color space that the custom camera LUT converts to.
The target color space is usually indicated in the custom camera LUT name.
Click Open.
-
The custom camera LUT you imported appears in the Custom Camera section of the Camera LUT pop-up menu. If you imported a folder of LUT files, it appears as a submenu in that section of the pop-up menu.
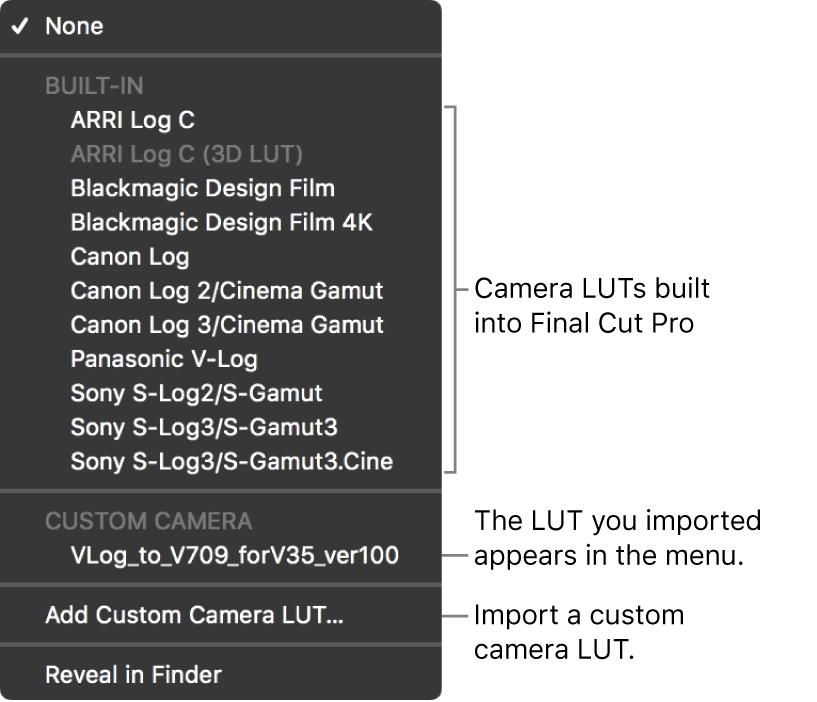
To remove imported custom camera LUTs from the Camera LUT pop-up menu, choose Reveal in Finder to open the Camera LUTs folder, drag the LUT files to the Trash, and reopen Final Cut Pro.
Note: If you imported a custom camera LUT and applied it to a clip, but the LUT file is missing from the Camera LUTs folder, a yellow warning button appears next to the Camera LUT pop-up menu. Click the warning button to reimport the custom camera LUT or to replace it with a different one.
![]()
Premiere Pro classifies LUTs in two categories:
Input LUT: An Input LUT interprets footage. It is applied on flat log footage to enhance and color correct footage. You can use it a starting point for grading footage.
Looks: A Look is a LUT designed to change the appearance and color style of a clip. Apply looks to make your video look like a professionally shot film. For more information, see Get creative with color using Lumetri looks..
How to add LUTs
To add a LUT, do the following:
Select a clip in the Timeline panel.
Do one of the following:
In the Lumetri panel, open the Basic Correction tab.
In the Effects Control panel, open the Basic Correction tab from the Lumetri section.
In the Basic Correction tab, select the Input LUT dropdown menu. You can add existing LUTs from Premiere Pro. To add a new LUT, click Browse…
The File Explorer on your system opens. Select the LUT of your choice.
The LUT is applied on the clip. You can then edit the white balance and tone of the clip.
Export Looks, LUTs, and save presets
Premiere Pro lets you save and reuse your color adjustments in different projects or applications. You can export color grading information as a .look file or a LUT file to use in Adobe Premiere Pro or a third-party application.
Select the Lumetri Color pop-up menu, and choose one of the following:
Export .look: Exports color adjustments as a Lumetri Look preset file in .look format.
Export .cube: Exports Lookup tables in .cube format for import into other color grading applications.
Save Preset: Customise individual color effect settings and save them as presets. In the Save Preset dialog box, specify a name for your preset. If desired, enter a description. For more information, see Create and save an effect preset.
Install Custom LUT files
Once you have exported a LUT file, you can install them into other applications. In Premiere Pro, custom LUT files appear in the Lumetri Color panel. LUTs from other applications or to support cameras can also be installed so that they are available in Premiere Pro.
To install a custom LUT file, create one or more of the directories listed below:
macOS
Available only to the local user:
From the macOS Finder, select Go > Go to Folder and enter this path: ~/Library/Application Support/Adobe/Common/LUTs. This location contains two folders: Input and Output. Premiere Pro uses LUTs stored in the Input folder for this operation: Modify > Interpret Footage > Color Management > Input LUT (Modify > Color > Input LUT in Premiere Pro v 24.0 and later). In Premiere Pro 24.0 (or later), LUTs stored in the Input folder also appear in Lumetri Color > Settings > Source Clip > Input LUT.
You can also create the following folders to store LUTs:
~/Library/Application Support/Adobe/Common/LUTs/Creative – LUTs stored here appear in Lumetri Color > Creative > Look.
~/Library/Application Support/Adobe/Common/LUTs/Technical – LUTs stored here appear in Lumetri Color > Basic Correction > Input LUT.
Available to all users:
You need to create the /Library/Application Support/Adobe/Common/LUTs folder (absolute path) and all other folders that you need inside it. To create these folders, you need Admin credentials.
Windows
Available only to the local user:
On Windows, LUTs are stored in the C:\Users\<user_name>\AppData\Roaming\Adobe\Common\LUTs\ location. This location contains two folders: Input and Output. Premiere Pro uses LUTs stored in the Input folder for this operation: Modify > Interpret Footage > Color Management > Input LUT (Modify > Color > Input LUT in Premiere Pro v 24.0 and later). In Premiere Pro 24.0 (or later), LUTs stored in the Input folder also appear in Lumetri Color > Settings > Source Clip > Input LUT.
You can also create the following folders to store LUTs:
C:\Users\<user_name>\AppData\Roaming\Adobe\Common\LUTs\Creative – LUTs stored here appear in Lumetri Color > Creative > Look.
C:\Users\<user_name>\AppData\Roaming\Adobe\Common\LUTs\Technical – LUTs stored here appear in Lumetri Color > Basic Correction > Input LUT.
Available to all users:
You need to create the C:\Program Files\Adobe\Common\LUTs\ folder and all other folders that you need inside it. To create these folders, you need Admin credentials.
![]()
Install LUTs in DaVinci Resolve
1. First, we need to install the LUTs into DaVinci. It’s not possible to just pick and choose some LUTs quickly without doing these steps.
2. Open DaVinci Resolve on your computer. Open a project.
Click on the settings icon located in the bottom right corner. A new window will pop up.
3. Go to Color Management. Scroll down and find ‘Lookup Tables’. Then click on ‘Open LUT Folder’.
The LUT Folder window pops up. Drag and drop the entire downloaded and unzipped folder into the LUT Folder.
Close the LUT Folder. In the ‘Color Management’ tab (step 4), click ‘Update Lists’.
Click ‘Save’.
![]()
- Step 1: Download the Files Labelled LUT. These “lookup table” files are what you’ll need to import to Filmora. …
- Step 2: Open Filmora Photo & Select a File to Edit. Open up the file you want to add your preset to.
- Step 3: Import Your Preset Folder. …
- Step 4: Adjust & Play!